[Step-by-step Guide]: How to apply for IPO through HDFC Bank Netbanking

Step-by-Step Guide on how to apply for IPO through HDFC Bank Netbanking

Introduction

Welcome to this webnotes.in post on how to apply for the latest IPO (Initial Public Offering) through HDFC Bank Netbanking. You might be wanting to apply for the latest red-hot 🔥 IPO that has astronomical GMP (Grey Market Premiums), and your broker/friend/relatives have guaranteed you that you will surely get a listing gain, if you get allotment. However, please note that the applications to IPOs have their risks, which you should research before applying.

Can you apply for IPO through HDFC Netbanking?

The answer is YES. You can apply for IPO through HDFC Bank Netbanking through their Netbanking portal. This process should broadly have six (6) steps, and should take a maximum of 30 minutes ⏳. This process employs the ASBA (Application Supported by Blocked Amounts) method. This ensures that the retails investor’s funds leave his bank account only upon allocation of shares in public issues. The ASBA process also ensures that only the requisite amount of funds is debited to the investor’s bank account on allotment of shares. In this mechanism, the need for refunds is completely eliminated. The entire process is listed below. However, please, please go through the below steps to avoid getting errors, especially a notorious xxxxxx error, which stops the application process in its tracks, and does not allow you to complete the application.

Pre-requisites before you start

Before we start with the application process, please ensure that the following steps/checks:

  • ⚠️ This is important! 🚨 You have allowed the pop-ups for HDFC Bank and HDFC Securities. You can find the processes online for your respective browser, but here we will list process steps to allow pop-ups for HDFC Bank and HDFC Securities in Google Chrome.
    1. Click the More More at the top right of the Chrome browser.
    2. Click Settings.
    3. At the bottom, click Advanced.
    4. Under “Privacy and security,” click Content settings.
    5. Click Popups.
    6. Under “Allowed“, click “Add“. Turn Allowed on or off.  Type https://[*.]hdfcsec.com and https://[*.]hdfcbank.com. This is will ensure that the pop-ups are allowed for HDFC Bank.
  • 📝 The applicant has a bank account with HDFC Bank
  • 📝 The applicant has a demat account (not necessarily with HDFC Securities. You may apply through this method, even if you have a demat account with any of the discount brokers like Zerodha, Upstox, Groww etc.)

Step-by-Step Guide on applying for IPO through HDFC Bank Netbanking

Time needed: 30 minutes

  1. Login to your HDFC Netbanking Account

    • Go to the HDFC Bank Netbanking URL https://netbanking.hdfcbank.com/netbanking/, and login with your Customer ID, and Password

  2. Under Request, go to the IPO Application section

    • Next, under the Request section on the left hand bar, click to expand
    • Here, click on the IPO Application option.
    • You will get a warning message that you are being redirected to an external site (hdfcsec.com). Here, click Continue.
    • The next screen will be an overview of all the IPOs (Initial Public Offerings) presently in the application window, and these issues can be applied for.

  3. Scroll, and select the IPO which you wish to apply for

    •Here, scroll to the IPO you wish to apply for. Also, please note the correct type of application. Sometimes, the same IPO will have multiple quotas viz. HNI quota, Retail quota, Shareholders quota, or policyholders quota. So, ensure that you apply in the correct quota, under the desired public issue.

  4. Fill in all the desired/required details for the IPO

    • In the “Place Order” screen, choose the correct option from the dropdown under “Select Investor Status”.
    • Under “Bid Details”, enter the desired number of shares under “Shares Bid for”. Do ensure that number of shares are in multiples of the declared lot size. Next to it, under “Price per share Rs. “,enter the desired unit share price you wish to apply for. A good tip is to check the “Cut-off Price” checkbox. This is eliminate any issues with the incorrect share price being entered.
    • Next enter your PAN (Permanent Account Number) details, along with the date of birth details.
    • Under “Depository Details”, choose from NSDL, or CDSL, as the case may be with your demat account details.
    • Under “DP Name”, enter your broker name viz. Zerodha, Upstox, Groww etc.
    • If your demat account is with NSDL, i.e. if your demat account number starts with “IN”, then split your 16 character demat account number into two blocks of 8 characters. Enter the first block of 8 characters starting with “IN” under DP ID, and the rest of the 8 characters (all digits) under “Beneficiary A/C no”.
    • If your demat account is with CDSL i.e. your demat account number is a 16 digit number. If you select the Depository Details as CDSL, then the DP ID would be greyed out. You would need to update the entire 16 digit account number in Beneficiary Account Number field itself.
    • Click “Proceed”.

  5. Confirm on the request for the Online Fund Hold

    • The next popup will be the confirmation screen. Click “Confirm” to proceed.
    • 🚨 In case the pop-ups are not activated, you will NOT get this screen. So, please go back, activate the pop-ups and perform the entire process once again.
    • Next, click “I agree” on the disclaimer.
    • Click “Submit” on the “Online Fund Hold” option to block the amount.

  6. Done!

    • The final screen indicates that your IPO bid has been successfully.

Conclusion

That is it. The entire process to apply for the IPO through HDFC Bank Netbanking has been completed. All you need to do now is to wait until the allotment process has been completed, and you receive the update on whether or not you have received the allotment.

All the best in your investment journey! Best wishes to you!

How to increase HDFC Credit Card Credit Limit

Introduction

This article is the step-by-guide to increase the credit card limit of your HDFC Bank Credit Card. This article will list all the steps involved to do so via the HDFC Bank Netbanking portal.

Before we start

We assume the following:

  • You have a bank account with HDFC Bank.
  • You have an HDFC Bank Credit Card.
  • Net banking has been activated for the HDFC Bank bank account/Credit Card in question.

Step-by-Step Guide to increase your HDFC Bank Credit Card Credit Card Limit.

Time needed: 30 minutes

How to increase your spending limit of your credit card.

  1. Login to the HDFC Bank Netbanking portal

    a. Go to the https://netbanking.hdfcbank.com/netbanking/.
    b. Login with the User ID/Customer ID, IPIN/Password, and Secure Access Image/ Message.

  2. Navigate to the “Cards” section of the Netbanking Portal

    a. Click on the “Cards” section of the portal.

  3. Go to the “Request” Section on the side bar, and then select “Credit Limit Enhancement”

    a. On the left sidebar, under “Credit Cards, click on the “Request” option, to open/toggle further options.
    b. Scroll down, and select the “Credit Limit Enhancement”.
    c. In the main screen, now, from the drop down menu, choose the card which needs the credit limit enhancement, and click “Continue”.

  4. Choose the new desired Credit Limit

    a. In the next screen, you will see the card number, current credit limit, and eligible limit.
    b. In the final field, you will note a box, where you can enter the new desired credit limit. Enter the amount (this of course, should be less than, or equal to the eligible limit amount.
    c. Click “Continue”.

  5. Confirm the revised Credit Limit

    a. In the next screen, verify the details, most importantly the revised credit limit desired.
    b. Click “Confirm”.

  6. Done! The Credit Card Spend Limit has been immediately.

    a. The credit limit is updated immediately.

Conclusion:

So, that is it. These are all the steps you need to update/enhance your HDFC Bank credit card limit. This enhanced limit amount can be utilised immediately for any spends.

Check out other how-to guides, and info-wiki articles on webnotes.in. 

How to generate and download HDFC Bank Deposit Slip

How to download HDFC Bank deposit slip

Introduction :

This article lists the steps to get an soft copy of the HDFC Bank deposit slip. You can get two versions of the deposit slip, either (a) pre-filled, OR (b) blank HDFC Bank account deposit slip ..

Before you start to download the Bank Deposit Slip

We assume the following:

  • You have a bank account with HDFC Bank
  • You have net banking facility activated for the HDFC Bank bank account in question.

Step-by-step guide to generate and download the HDFC Bank Deposit Slip

Time needed: 15 minutes

Step-by-step guide to generate either (a) pre-filled , or (b) blank deposit slip ..

  1. Login to the HDFC Bank Netbanking portal

    a. Go to the https://netbanking.hdfcbank.com/netbanking/.
    b. Login with the User ID/Customer ID, IPIN/Password, and Secure Access Image/ Message.

  2. Navigate to the appropriate tab under the “Request” section under “Accounts”

    a. Under “Accounts”, click on “Request” to expand the option, and choose the “Download Deposit Slip” option..

  3. Choose the type of the Deposit Slip needed

    a. Choose the type of deposit slip needed. viz. whether (i) Blank Deposit Slip, or (ii) Pre-printed Deposit Slip/Pre-filled Deposit Slip
    b. If you desire Pre-printed Deposit Slip, then you can choose the bank account number from the drop down list in the “Select an account” option.

  4. Accept the terms and conditions.

    a. Here, click the checkbox, indicating that you accept the terms and conditions.

  5. Click “Download”

    Next, click “Download” to download a PDF copy of the deposit slip, that may be printed, and used, while performing the in-person transactions at the HDFC Bank branch.
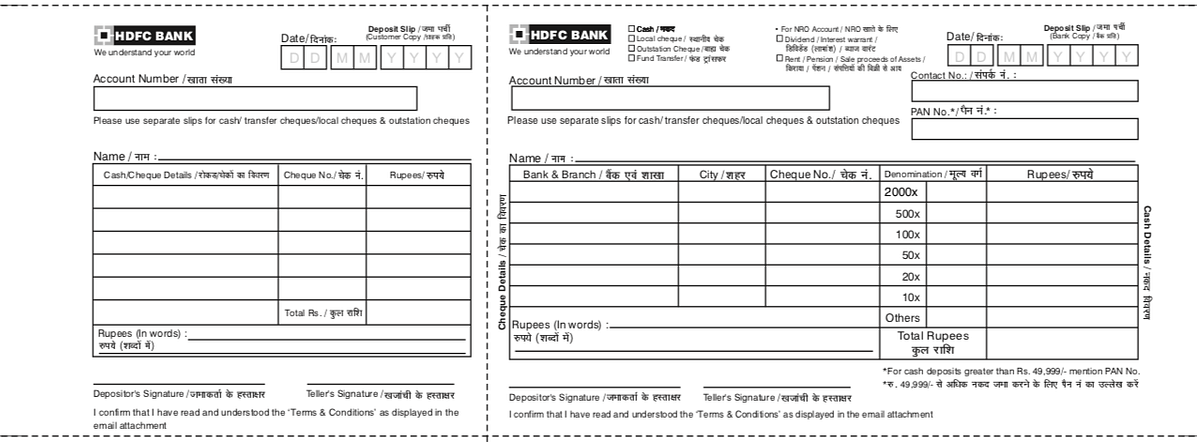
    Sample of the same is below HDFC Bank Deposit Slip

  6. Done!

    You now have a PDF copy of the deposit slip, Feel free to print multiple copies, and/or take photocopies of the same to use in the branch for in-branch transactions.

Conclusion.

So, that is it. These are all the steps you need to generate the deposit slip, that can be used for all your in-branch physical transactions at the Bank.. You may printout a copy, and then use photocopies to use at the branch, whenever you next visit for in-branch transactions. Now, there is no frantic search for the slips, when you step into the branch. You may fill in the slips in the convenience of your home, and visit the branch for the transaction only.

Check out other how-to guides, and info-wiki articles on webnotes.in. 

How to apply for IPO through HDFC Netbanking (ASBA method)

How to apply for IPO through HDFC Bank Netbanking

Introduction

  • This post is for you, if you wish to apply for IPO through HDFC Bank Netbanking, while having a demat account, that is NOT with HDFC Securities.
  • This application is via the ASBA mode (ASBA: Application Supported by Blocked Amounts). In this system, the amount needed to apply for an IPO is blocked in the selected savings account, without being debited.
  • The IPO allotment is deducted from your bank account ONLY if you get the IPO allotment of shares.

Points to note: before you start:

  • You have a bank account with HDFC Bank.
  • You have a demat account (not necessarily with HDFC Securities), and you know the 16 digit demat account details (viz. Demat account number, name of the DP, and know whether the Demat account is with NSDL or CDSL).
  • This next step is important! You have allowed the pop-ups for HDFC Bank and HDFC Securities.  Following is the process to allow pop-ups for HDFC
    • For Google Chrome:
      • Click the More More at the top right of the Chrome browser
      • Click Settings.
      • At the bottom, click Advanced.
      • Under “Privacy and security,” click Content settings.
      • Click Popups.
      • Under “Allowed“, click “Add“. Turn Allowed on or off.  Type https://[*.]hdfcsec.com and https://[*.]hdfcbank.com. This will allow pop-ups, which are needed only for the IPO application.
    • You may search online for the steps to allow pop-ups for other browsers, and implement them.

Steps to apply for IPO through HDFC Bank Netbanking

Time needed: 30 minutes

  1. Login to HDFC Netbanking Portal

    Go to the URL for HDFC Netbanking https://netbanking.hdfcbank.com/.
    Log in with your credentials.

  2. Navigate to the IPO Application Module in HDFC Bank Netbanking

    Under Accounts, expand the Request option.
    Click the IPO Application option.
    Click on Continue when you see the message “You will be redirected to the IPO system. In case you want to proceed, please click on continue“.

  3. The IPO Module in HDFC Securities

    The IPO Application module in HDFC Securities will next open.
    This is the general overview window, which also lists the IPOs in the subscription window, and can be applied for.
    Choose the Issue IPO that you wish to apply for, and click “Apply” under “Action“.

  4. Overview/Update of Initial IPO/Issue Details

    Choose the appropriate option under “Select Investor Status“.
    You will next note the message: “ASBA (Application Supported by Blocked Amounts): This ensures that the retails investor’s funds leave his bank account only upon allocation of shares in public issues. The ASBA process also ensures that only the requisite amount of funds is debited to the investor’s bank account on allotment of shares. In this mechanism, the need for refunds is completely eliminated.“. Click OK..
    Next you can see the details of the IPO/Issue, if you click “More Info” at the bottom of the page. You will find details viz. Issue Name, Type, Price Band, Minimum Investment Value, Maximum Investment Value, Lot Size, Tick Size, Issue Date (Application Window), CutOff Time, and Cutoff-shares

  5. Enter the IPO bid details

    Under Bid Details:
    Enter the number of shares you wish to apply for under “Shares bid for“, and the price under the “Price per share” field. A good time saver would be tick the checkbox the “Cut Off Price“.

  6. Update the IPO applicant details

    The Applicant Name, and PAN (Permanent Account Number) details would have been pre-filled. Please note the FAQs to see the exception for applicants from the state of Sikkim
    Enter the Date of Birth, and Father’s/Husband’s Name.

  7. Enter the Demat Account Details

    Next enter demat account details.
    Choose the Depository from the drop down, viz. NSDL, or CDSL.
    Enter the DP Name (Depository Participant Name) in the next field.
    This next field will have two variations, viz. whether your depository is NSDL, or CDSL.
    If your depository is NSDL, enter the 8 alphanumeric characters of your demat account in the DP ID part, and the last 8 characters of your demat account number in the Beneficiary A/C no part.
    If your depository is CDSL, then the DP ID field is greyed our, and you can enter the entire 18 digit number in the Beneficiary A/C no field.

  8. Confirm the bank account details

    Confirm the HDFC Bank account details. (that is pre-filled).
    Next, click “Proceed“.

  9. Disclaimer Screen Read Receipt

    In the next screen, click “I agree” after the detailed disclaimer, if acceptable.

  10. Confirm the “Online Fund Hold”

    Next screen indicates that there is a cash shortfall, and asks for the account to arrange the money collect. Choose the account number, click “Submit

  11. Confirmation of the IPO application bid

    The final screen in the process is the confirmation of the IPO application bid. And the application number, and transaction number is shared, along with the final message “Your bid has been successfully placed”..

    Congratulations! This is the end of the IPO application process.

FAQs

Test question.

Note(*)- 1.Enter SIKKIMCATG in PAN field, if you are a customer from the state of Sikkim
               2.Ensure that the name on the PAN card matches with the Demat Holder’s name

OR

Return to home page